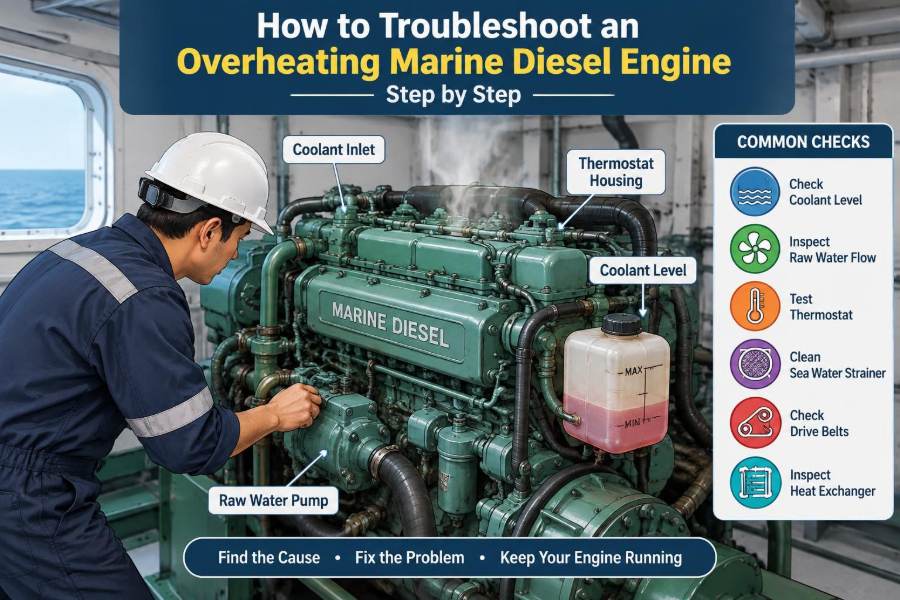

A rising engine-temperature alarm changes the atmosphere on board immediately. Whether you are approaching a berth, pushing against a tide, or running a generator during a hot afternoon, the question is the same: is this a brief operating change, or the start of equipment damage?
Marine diesel engines depend on several systems moving heat away continuously. A restriction in raw-water flow, a low coolant level, a slipping belt, or an incorrect sensor signal can all produce a similar warning, but they do not carry the same risk or require the same response.
The safest troubleshooting method is not to guess at the most likely faulty part. It is to stabilize the engine, confirm that the reading is real, and inspect the cooling path in a logical order—from the seawater intake to the engine’s internal coolant circuit.
This guide is written for students, watchkeepers, and working professionals. Always follow the vessel’s operating manual, permit-to-work arrangements, lockout procedures, and the chief engineer’s instructions. A hot, pressurized cooling system can cause serious injury.
🌡️ What “Overheating” Actually Means
An engine overheats when heat is generated faster than the cooling and lubrication systems can remove it. Combustion naturally produces intense heat; normal operation depends on maintaining metal, oil, and coolant temperatures within the maker’s specified ranges.
Do not treat every elevated reading as identical. A gradual rise under heavy load differs from a sudden spike at constant load. The pattern is evidence: it helps identify whether the problem is flow, heat transfer, loading, combustion, or instrumentation.
🚨 Put Safety and Vessel Control First
Before troubleshooting, reduce risk to people, propulsion, and the engine. Inform the bridge or relevant operator, acknowledge alarms according to procedure, and reduce load if vessel safety permits.
- Reduce engine speed or generator electrical load progressively.
- Monitor lubricating-oil pressure, exhaust temperatures, coolant pressure, and abnormal noises.
- Prepare for a controlled stop if temperature continues to rise.
- Never open a hot expansion-tank cap or disconnect a pressurized hose.
If the maker’s shutdown alarm operates, or there is steam, coolant loss, severe noise, or loss of oil pressure, follow the emergency procedure rather than attempting extended diagnosis while running.
🧭 Record the Conditions Before Changing Anything
A quick log preserves clues that disappear once load is reduced. Note engine speed, load, coolant temperature, raw-water pressure if fitted, lube-oil temperature, exhaust temperatures, sea state, and the time the rise began.
Also note recent work: a strainer cleaning, cooler overhaul, coolant top-up, valve adjustment, or change in operating area can be highly relevant. A fault appearing immediately after maintenance deserves inspection of the disturbed component first.
📈 Read the Temperature Trend, Not Just the Alarm
A temperature that rises rapidly after start-up may point to no coolant circulation, trapped air, or a thermostat that is not opening. A slow rise over hours often suggests fouling, a partially blocked cooler, insufficient seawater flow, or sustained overload.
A rise only at high load can mean the cooling system has lost reserve capacity. It may work adequately at low output but cannot reject the additional heat produced when fuel delivery and cylinder pressure increase.
🔎 Confirm That the Indication Is Real
Before dismantling equipment, verify the signal. Compare the alarmed gauge with a second independent indication where available. An infrared thermometer can help compare external housing temperatures, but its reading depends on surface condition and emissivity, so use it as a comparison tool rather than a sole authority.
Check sensor wiring, loose terminals, damaged insulation, and connectors exposed to vibration or moisture. A faulty sender can create a false high alarm, but never assume this is the explanation until the engine’s actual condition has been assessed.
🛑 Know When to Stop Rather Than Investigate Under Load
Continued running can distort cylinder heads, damage head gaskets, degrade lubricating oil, seize pistons, or crack components. The correct decision depends on the maker’s limits and the vessel’s operational situation, but a rising temperature despite load reduction is a strong warning.
Stopping may be inconvenient; rebuilding an overheated engine is far more disruptive. If safe propulsion or electrical redundancy exists, allow the engine to cool before opening covers, drains, or cooling-system connections.
💧 Understand the Two Cooling Circuits
Most marine diesel installations use two linked circuits. The freshwater circuit circulates treated coolant through engine jackets, cylinder heads, and often the oil cooler. The raw-water circuit draws seawater or river water through strainers and coolers, then discharges it overboard.
The freshwater circuit carries heat out of the engine. The raw-water circuit carries that heat away from the vessel. A fault in either circuit can produce high jacket-water temperature.
🌊 Start at the Sea Chest and Suction Valve
Confirm that the correct sea suction valve is open and that the sea chest arrangement matches the vessel’s operating condition. Some vessels have high and low suctions selected according to draft, sea state, ice risk, or harbour water conditions.
Do not force a seized valve or open pipework without authorization. If suction pressure is low or absent, investigate the inlet route carefully; marine growth, debris, a closed valve, or air entering the suction side can starve the raw-water pump.
🧺 Inspect the Sea Strainer Properly
A blocked strainer is one of the most common and most accessible causes of reduced seawater flow. Weed, plastic film, jellyfish, shells, rust scale, and harbour debris may restrict flow even when the basket does not look completely full.
Isolate and drain the strainer according to the vessel procedure. Clean the basket, examine its seals, and make sure the cover is seated correctly. An air leak at the cover can prevent a pump from maintaining suction without leaving an obvious external water leak.
🔄 Check the Raw-Water Pump and Its Drive
Raw-water pumps may use rubber impellers, flexible vanes, gears, or centrifugal designs. Inspect the drive arrangement for broken belts, slipping couplings, incorrect rotation, or mechanical damage.
For an impeller pump, a missing or damaged vane is not a minor finding. Pieces can travel downstream and lodge in a cooler passage, creating a restriction that remains after a new impeller is installed.
🫧 Look for Air Leaks on the Suction Side
Air can enter a raw-water suction line through a loose strainer cover, hardened gasket, cracked hose, poor clamp, or valve-stem packing. Because this side of the pump is under suction, the fault may draw air inward rather than leak water outward.
Typical signs include intermittent discharge, a pump that loses prime after stopping, bubbles in a transparent section if fitted, or a temperature problem that worsens in rough water. Correct the leak and re-prime the system as specified.
🚿 Verify Discharge and Differential Pressure
Overboard discharge is useful evidence, but a visible stream does not prove adequate flow. Some flow may still be present while cooler passages are badly restricted. Compare suction and discharge pressures, flow indicators, or cooler differential pressure with normal vessel data where instruments exist.
A rising differential pressure across a cooler or strainer generally indicates increasing resistance. Interpret readings in context: gauges can fail, and pressure alone does not measure heat-transfer effectiveness.
🧊 Examine Coolers for Fouling and Scaling
Heat exchangers transfer heat through metal surfaces. On the seawater side, marine growth and deposits reduce flow and insulation-like fouling reduces heat transfer. On the freshwater side, corrosion products, oil contamination, and poor coolant chemistry can restrict passages.
Tube bundles should be opened, cleaned, and pressure-tested only under approved maintenance procedures. Aggressive mechanical cleaning can damage thin tubes; chemical cleaning must match the cooler material and disposal requirements.
🧪 Check Coolant Level and Coolant Condition
After the engine has cooled and pressure has been safely released, check the expansion tank level. Low coolant may expose parts of the engine to steam pockets and reduce circulation. Repeated low level is not a condition to top up and ignore—it suggests a leak, overflow, or internal loss.
Look for discoloration, rust, oil film, sediment, or an unsuitable mixture. Correct coolant concentration protects against corrosion and cavitation as well as freezing. Use the maker-approved water quality and inhibitor specification rather than mixing products casually.
🔧 Inspect the Freshwater Circulating Pump
The jacket-water pump must maintain circulation through the engine and heat exchanger. A damaged impeller, worn pump, failed mechanical seal, blocked suction, or slipping drive can sharply reduce flow.
Check for leakage from the seal drain, unusual bearing noise, vibration, and drive condition. If a pump has been dismantled, confirm impeller orientation, gasket condition, and that isolation valves were returned to their normal operating positions.
🌡️ Test the Thermostat or Temperature-Control Valve
A thermostat helps the engine warm up promptly, then opens to route coolant through the cooler. If it sticks closed, flow through the cooler may remain too low. If it sticks partly open, temperature may be unstable or the engine may run too cool under light load.
Testing normally involves removal and controlled heating in accordance with maker data. Do not remove a thermostat permanently as a “fix.” Doing so can mask the underlying problem and upset designed warm-up and temperature control.
🪤 Remove Air Locks From the Freshwater Circuit
Air trapped at high points can interrupt circulation and create local hot spots even when the expansion tank appears full. This is especially likely after draining, hose replacement, cooler work, or a rapid coolant loss.
Use designated vent points and the approved filling method. Opening random plugs on a hot engine is unsafe and may introduce further leakage. After venting, recheck level after the engine has reached normal temperature and cooled again.
🧯 Investigate External Coolant Leaks
Inspect hoses, clamps, pump seals, cooler covers, drain cocks, heater connections, and expansion-tank overflow lines. Dried coolant residue is often easier to find than an active leak, particularly around hot components where small leaks evaporate.
Pressure testing a cool system can reveal leaks that are difficult to see while running. Use only the specified test pressure; excessive pressure can damage seals or create a new failure.
⚙️ Consider Engine Load and Operating Conditions
Overheating is not always a cooling-system fault. A propeller fouled by rope, nets, or marine growth increases torque demand. Heavy weather, shallow-water operation, towing, or a generator carrying unexpected load can increase heat production beyond normal conditions.
Compare actual load with the engine’s permitted operating envelope. Reducing load may stabilize temperature, but it is a temporary operating measure unless the underlying excess demand is understood and corrected.
🔥 Use Exhaust Temperatures as Combustion Clues
Exhaust-gas temperature patterns can help separate cooling faults from combustion problems. One cylinder significantly hotter than its neighbours may indicate a fuel-injection issue, poor atomization, incorrect timing, a sticking injector, poor air supply, or valve leakage.
All cylinders rising together is more consistent with general overload or a common cooling issue, though this is not absolute. Treat trends and cylinder-to-cylinder comparison as diagnostic evidence, not as a final diagnosis.
🌬️ Check the Air Side of the Engine
Diesel combustion requires an adequate supply of clean air. A blocked intake filter, fouled turbocharger compressor, charge-air cooler restriction, damaged duct, or blower fault can reduce air mass and increase exhaust temperature.
On turbocharged engines, inspect only when safe and stopped as required. Turbochargers continue rotating after shutdown, and hot surfaces remain hazardous. Air-side faults can develop into overheating indirectly by raising the engine’s heat load.
🛢️ Watch Lubricating-Oil Temperature and Pressure
High cooling-water temperature can heat the lubricating oil, reducing its viscosity and its ability to maintain protective oil films. Conversely, an oil-cooler problem can raise oil temperature even when jacket-water temperature initially looks acceptable.
Low oil pressure with high temperature is particularly serious. It may reflect thin hot oil, low oil level, a pump or bearing problem, or an instrument fault. Do not treat it as a secondary alarm during an overheating event.
🧱 Recognize Possible Internal Engine Faults
If external cooling checks are satisfactory yet coolant continues to disappear, pressurize unusually, or show combustion contamination, an internal fault may be involved. Possibilities include a damaged head gasket, cracked head, liner sealing failure, or cooler core leak.
Warning signs can include persistent bubbles in the expansion tank, unexplained coolant loss, oil contamination, white exhaust under some conditions, or one cylinder behaving abnormally. These symptoms require systematic tests by competent personnel; none alone proves a specific failure.
📊 Use a Simple Fault-Pattern Reference
| Observed pattern | Likely area to inspect first | Useful confirming check |
|---|---|---|
| Rapid rise soon after start | Coolant circulation, air lock, thermostat | Compare hose temperatures and verify pump operation |
| Slow rise at high load | Cooler fouling, raw-water restriction, overload | Check pressures, strainers, load, and cooler condition |
| Intermittent high temperature | Air leak, intermittent blockage, loose sensor connection | Inspect suction seals, wiring, and operating conditions |
| One hot exhaust cylinder | Fuel, air, injector, valve, or compression issue | Compare cylinder data and follow engine test procedures |
| Coolant loss and pressurization | External leak or internal combustion-gas entry | Pressure test and conduct approved internal-fault checks |
🧰 Follow a Logical Inspection Sequence
A disciplined sequence avoids wasted work and repeated exposure to hot machinery. Begin with operating data and obvious restrictions, then move from seawater supply to heat exchanger, freshwater circulation, control components, and finally internal engine causes.
- Stabilize the engine and reduce load or stop as required.
- Confirm the temperature indication and log associated readings.
- Check seawater inlet, strainer, pump, and discharge evidence.
- Inspect cooler condition and compare relevant pressures.
- When cool, inspect coolant level, leaks, pump, thermostat, and venting.
- Assess load, exhaust temperatures, air supply, and oil condition.
- Escalate to internal diagnostics if external causes are excluded.
❌ Avoid Common Troubleshooting Mistakes
The most dangerous error is opening a pressurized cooling system too soon. Hot coolant can flash into steam when pressure is released, causing burns even if the engine is no longer running.
Other common mistakes include replacing a sensor without checking actual temperature, clearing a strainer without finding debris downstream, adding untreated water without correcting coolant chemistry, and running at reduced load indefinitely without identifying why the system lost capacity.
📝 Document the Defect and the Repair
A useful defect report records symptoms, readings, inspection results, work done, parts replaced, coolant added, and post-repair test conditions. “Engine overheated; cleaned strainer” is less useful than a record showing the temperature trend, debris found, pump condition, and final stable operating data.
Good documentation supports planned maintenance and helps the next watch distinguish a recurring issue from a new fault. It can also reveal seasonal patterns, such as frequent intake fouling in a particular port.
🛠️ Prevent the Next Overheating Event
Prevention centres on maintaining flow, clean heat-transfer surfaces, correct coolant chemistry, and reliable instrumentation. Follow scheduled checks for strainers, belts, pump condition, cooler cleaning, thermostat testing where specified, and sensor calibration or functional checks.
Before high-load operation, confirm cooling valves are correctly lined up and alarms are functional. After any cooling-system work, verify venting, leak tightness, normal temperature rise, and stable readings during a supervised run.
🎯 The Core Principle: Diagnose the Heat Path
Every overheating fault can be approached as a problem in the heat path: too much heat is being created, too little coolant is circulating, too little seawater is removing heat, heat-transfer surfaces are impaired, or the indication is wrong.
Protect the engine first, then test each part of that heat path with evidence rather than assumptions. This approach is safer than random parts replacement and works across propulsion engines, auxiliary diesels, and many marine cooling arrangements.
A calm response, accurate log, and methodical inspection turn an overheating alarm from a confusing emergency into a manageable engineering problem. Respect the hazards of hot pressurized systems, use maker-specific data, and escalate when the evidence points beyond routine checks. 🚢🌡️🔧