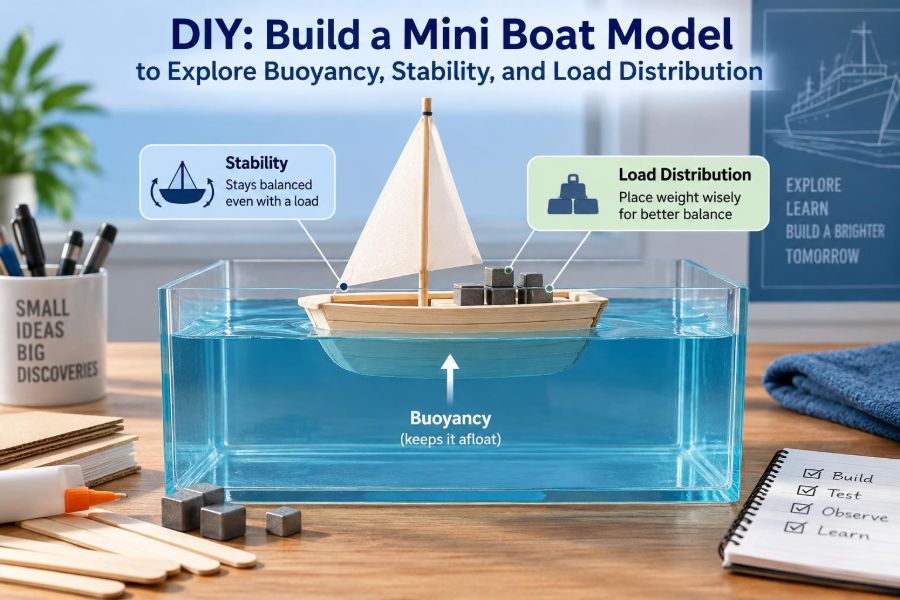

A small boat model can reveal the same basic questions that shape full-size vessel design: Will it float at its intended waterline? Will it stay upright when people or cargo move? Where can weight be placed without making the vessel unsafe?
These are not abstract questions. A ferry that lists after vehicles are loaded, a workboat that becomes top-heavy after equipment is fitted, and a cargo vessel trimmed too far by the bow all demonstrate the consequences of managing weight and buoyancy poorly.
Building a miniature boat does not reproduce every force acting on a ship at sea. It does, however, create a hands-on laboratory for observing displacement, centre of gravity, heel, trim, and load distribution with materials you can handle at a desk or test tank.
The goal is not to build a perfect scale ship. It is to make deliberate design choices, test them, record what happens, and use the results to understand why naval architects and marine engineers treat weight placement as seriously as total weight.
⚓ Define the Design Challenge
Start by giving your model a clear job. “A boat that floats” is too broad to guide useful decisions. A better challenge might be: carry 20 identical washers without taking on water, remain upright when one washer is moved sideways, or travel across a storage tub with a small fan.
A defined task creates measurable criteria. It also makes trade-offs visible: a narrow hull may move efficiently through water, while a wider hull may carry more load with greater initial stability.
🧠 Connect the Model to Real Marine Engineering
Your model is an analogy, not a certified vessel design. Its materials, surface tension effects, and size are very different from those of steel, aluminium, or composite ships. Still, the governing ideas are the same.
- Buoyancy supports the boat’s weight.
- Stability describes its tendency to return upright after it heels.
- Load distribution determines where the weight acts and how the hull sits in the water.
- Freeboard is the vertical distance from the waterline to the deck edge or opening.
Engineers use calculations, drawings, inclining tests, and stability information to manage these relationships. Your model lets you observe their physical meaning first.
🧰 Gather Simple, Consistent Materials
Choose materials that are easy to alter without becoming soggy or excessively heavy. A shallow plastic food container, foam tray, folded corrugated plastic, or sealed cardboard hull can all work, although a waterproof material simplifies repeated testing.
Useful supplies include:
- A transparent tub, sink, or basin wide enough for the model to heel safely
- Ruler, marker, masking tape, scissors, and waterproof adhesive
- Coins, metal washers, small nuts, or identical clay pieces as test loads
- Drinking straws, craft sticks, or skewers for simple frames and markers
- Modelling clay for ballast and small adjustments
- A notebook or spreadsheet for observations
Use identical test weights where possible. Comparing “three washers amidships” with “three washers near the stern” is much clearer than comparing objects of unknown mass.
🛟 Build Safety into the Experiment
Keep electrical devices away from the water and avoid sharp tools unless you can use them safely. If you use a large tub, place it on a stable floor or work surface rather than a crowded desk.
Do not test with valuable electronics, loose batteries, or objects that can contaminate drains. A simple tray beneath the tank catches spills and makes repeated trials less disruptive.
📐 Choose a Hull Form Deliberately
The hull is the watertight body that displaces water. For a first model, choose a simple barge-like hull: broad, shallow, and approximately rectangular. Its behaviour is easier to interpret than that of a complex ship-shaped form.
A second option is a V-bottom hull made from folded plastic sheet or waterproof board. It may look more like a fast craft, but its stability changes more noticeably as it heels. That makes it useful for comparison once the basic experiment is understood.
🏗️ Make the Hull Watertight
Water inside the hull is not merely an inconvenience; it is an uncontrolled load. Seal seams carefully with tape or waterproof adhesive, especially at corners and along the bottom.
Before adding a deck or cargo, float the empty hull for several minutes. Mark any seepage and repair it. A leak can be mistaken for a buoyancy or stability problem, so eliminate that variable early.
🌊 Understand Archimedes’ Principle
A floating body displaces an amount of water whose weight equals the body’s total weight. This is Archimedes’ principle, and it explains why a heavy steel ship can float: its hull encloses enough volume to displace an equal weight of water before it submerges too deeply.
When you add a washer to the model, its total weight rises. The hull must sink slightly farther until it displaces additional water weighing the same as that washer. This extra immersion is a direct observation of buoyancy at work.
📏 Mark a Reference Waterline
Float the empty hull in calm water and mark the waterline with a removable strip of tape or a fine marker. Then add a planned “basic outfit” such as the deck, mast, and fixed ballast, and mark a second reference line.
These marks turn a vague visual impression into a measurement tool. They help you see whether added cargo causes even sinkage, stern-down trim, bow-down trim, or a sideways list.
⚖️ Measure Displacement with a Simple Method
For a school-level model, you do not need laboratory-grade precision. Weigh the boat and its loads on a kitchen scale if one is available, then observe how deeply it floats. Alternatively, add equal weights one at a time and record the waterline after each addition.
The key relationship is straightforward: more total mass requires more displaced water. If your hull reaches its deck edge after only a small extra load, it does not have enough reserve buoyancy for that task.
📦 Learn What Reserve Buoyancy Means
Reserve buoyancy is the watertight volume above the current waterline that can be immersed before critical openings flood. A boat may float perfectly well at rest yet have little margin for waves, turning, a moving passenger, or a shifted load.
On the model, freeboard is your practical warning sign. If the edge is only a few millimetres above water, a small heel can bring one side below the surface. This is why loading capacity is not simply the point at which an empty hull first sinks.
🧪 Run a Baseline Float Test
Place the completed empty model in still water. Observe whether it floats level and whether it leans to one side. If it lists immediately, check for uneven structure, trapped water, or heavier fittings on one side.
Record the following before changing anything:
- Bow and stern waterline positions
- Port and starboard freeboard
- Whether the hull rolls easily when touched lightly
- Any leaks or flexing panels
This baseline makes later improvements meaningful. Without it, a “better” result is difficult to verify.
➕ Add Loads in Controlled Increments
Add one identical test weight at a time near the centre of the hull. Pause after each addition so the water settles, then mark or note the new waterline. Continue only while the hull retains practical freeboard.
Do not rush toward the dramatic capsize point. In real operations, safe loading limits are set well before water reaches vulnerable openings. Your useful result is the point where the boat still has a sensible margin, not the point where it finally fails.
🗺️ Locate the Centre of Gravity
The centre of gravity, often written as G, is the point through which the boat’s total weight can be considered to act downward. It depends on every component: hull, deck, mast, cargo, ballast, and even absorbed water.
You cannot see G directly, but you can influence it. Heavy clay placed low in the hull lowers G. A tall mast, stacked cargo, or weight on an upper deck raises G. A lower centre of gravity generally improves the model’s resistance to small angles of heel.
🪨 Use Ballast with Purpose
Ballast is weight intentionally carried low in a vessel to manage draft, trim, or stability. In your model, modelling clay pressed along the bottom is convenient ballast because its position can be changed easily.
Ballast is not a free solution. It increases displacement and reduces freeboard because the hull must support its weight. A well-ballasted model may be more stable but carry less additional cargo than the same hull without ballast.
↔️ Test Transverse Stability
Transverse stability concerns side-to-side heel. Place a small load at the centreline, then move it gradually toward the port side. Watch the hull rotate and note how much freeboard remains on the lowered side.
Move the same load back toward the centreline. If the boat returns upright, it has a restoring tendency in that range of heel. If it remains noticeably tilted, check for an offset fixed weight, water trapped on deck, or a hull shape that has reached an unstable condition.
📍 Meet Buoyancy Centre and Metacentre
As an upright hull heels, the submerged shape changes. The centre of buoyancy, the effective centre of the displaced water volume, shifts toward the lower side. That shift can create a restoring moment that pushes the boat back upright.
For small angles of heel, naval architects describe this using the metacentre, often represented by M. When M is above G, the vessel has positive initial stability; when G is too high relative to M, it may be tender or unstable. Your model demonstrates the effect, even though calculating M accurately requires hull geometry and careful measurement.
📐 Compare Wide and Narrow Hulls
A wide, flat-bottomed model usually develops a strong initial restoring effect because its underwater shape changes significantly with a small heel. It can feel stiff: it resists rolling and returns upright quickly.
A narrow hull often heels more readily under the same sideways load. That does not automatically make it poorly designed. Slender hulls may be chosen for speed, reduced resistance, or operating requirements, but their stability must be managed through geometry, ballast, hull arrangement, or multiple hulls.
| Hull feature | Likely model behaviour | Design trade-off |
|---|---|---|
| Broad beam | Greater initial resistance to heel | Can create more drag and require more material |
| Narrow beam | Heels more easily under side load | May suit low-resistance or slender craft concepts |
| Low ballast | Lowers centre of gravity | Consumes payload and freeboard |
| High deck load | Raises centre of gravity | Useful space can reduce stability margin |
🏗️ Explore Vertical Load Placement
Keep the same number of washers and compare two arrangements: place them on the hull bottom, then stack them on a raised platform. The total displacement is nearly unchanged because the total weight is unchanged, but the stability response can change sharply.
This is a useful distinction. Buoyancy answers whether the vessel can support the weight; stability answers how it behaves when disturbed. A boat can have enough buoyancy to float and still capsize because its weight is placed too high.
↕️ Investigate Longitudinal Trim
Trim is the difference between draft at the bow and draft at the stern. Move several identical loads from amidships toward the bow and observe the forward end sink. Then move them toward the stern and compare.
Moderate trim is not always undesirable; vessels may operate with a planned trim for propulsion, cargo handling, or seaworthiness reasons. Excessive trim, however, can reduce freeboard at one end, expose propellers improperly in full-size vessels, or make deck drainage and handling more difficult.
🎯 Keep Weight Near the Centreline
A central load produces minimal heeling moment because its weight acts close to the boat’s centreline. The farther a load moves sideways, the greater its lever arm and the stronger its tendency to rotate the hull.
Try placing one washer near the centre, then at the edge. The washer weighs the same in both cases, but the result is different because the line of action of its weight has moved. This is the same reason cargo plans specify positions, not merely total cargo mass.
🔄 Model a Shifting Cargo Scenario
Loose cargo can move when a vessel rolls, accelerates, or encounters waves. To simulate this, place a smooth bead or marble in a shallow tray on the model’s deck. Gently tilt the model and observe how the moving object increases the heel.
This is a simplified demonstration, not a full representation of cargo dynamics. Yet it shows why securing cargo matters: once a load shifts to the low side, it can create an additional heeling moment precisely when the boat is already inclined.
💧 Recognise the Free-Surface Effect
Partly filled tanks create a special stability problem called the free-surface effect. When a vessel heels, liquid in a broad, partially filled tank flows toward the lower side, effectively raising the vessel’s virtual centre of gravity and reducing stability.
You can model this carefully with a small sealed container partly filled with water. Place it low inside the hull and compare its behaviour with an equally heavy solid item. Keep the container sealed; spilled water changes the experiment and can damage the model.
🧱 Add Bulkheads and Compartments
A bulkhead is an internal vertical partition. In real ships, watertight bulkheads limit flooding and divide spaces. In a model, lightweight partitions can keep small loose loads from sliding freely and can make the hull structure stiffer.
Do not assume every partition is watertight. A decorative divider will not stop water unless its edges are sealed to the hull. For this project, a compartment is most useful as a load-control feature rather than proof of damage survivability.
🌧️ Test the Consequences of Water on Deck
Add a few drops of water to a flat deck or shallow tray while the model is afloat. As the model heels, the water runs toward the low side, worsening the angle. This combines two hazards: added weight and a shifting liquid load.
Full-size deck drainage, raised coamings around openings, and protected ventilation points help manage similar risks. Your model makes the basic lesson visible: water where it does not belong can reduce both freeboard and stability.
🪜 Raise the Deck and Observe the Trade-Off
A raised deck edge can increase the height at which water enters the hull, potentially providing more reserve buoyancy. But if the raised structure is heavy, it also lifts the centre of gravity.
Use very light material for superstructures. This mirrors real design discipline: upper works, cranes, containers, and equipment are assessed not only for function but also for their effect on vertical centre of gravity.
📋 Create a Small Test Matrix
Good engineering comparisons change one variable at a time. Instead of rebuilding randomly, prepare a short test matrix. This prevents you from attributing an improvement to ballast when you also widened the hull and reduced the deck load.
| Test | Controlled change | What to observe |
|---|---|---|
| A | Increase centre cargo by one weight | Draft and remaining freeboard |
| B | Move one weight sideways | Heel angle and low-side deck edge |
| C | Move equal load fore and aft | Bow and stern trim |
| D | Lower fixed ballast | Return-to-upright tendency |
| E | Raise the same load | Change in stability without changing displacement |
📝 Record Observations Like an Engineer
Write down arrangements and outcomes immediately. Photos taken from the side at water level can help compare waterlines, while a simple grid behind the tank can provide a rough visual reference for heel.
Useful notes include the number and position of loads, ballast position, freeboard, trim direction, whether water entered, and the first condition that felt unsafe. Qualitative notes such as “slow return after sideways push” are valuable when paired with a clear load arrangement.
🔍 Diagnose a Persistent List
If the model leans in still water with no movable load fitted, diagnose before adding more ballast. Placing extra weight on the high side may level it temporarily but can hide the source of the imbalance.
- Check that the hull itself is symmetrical and not warped.
- Look for water trapped in a compartment or under a deck.
- Compare fixed fittings on port and starboard.
- Confirm that ballast is centred and firmly attached.
- Inspect the test tank: an uneven surface can mislead you.
Correcting the cause gives a more reliable model than compensating for it.
🚫 Avoid Common Testing Mistakes
The most common error is changing several factors at once. If you add ballast, widen the hull, lower the deck, and move cargo at the same time, you learn very little about which change produced the result.
Other avoidable mistakes include using loads of inconsistent mass, ignoring a leak, testing in choppy water, and treating capsize as the only failure condition. Water entering the hull, dangerously low freeboard, or severe trim are already meaningful warning signs.
⚙️ Improve the Design Through Iteration
After testing, choose one specific problem to solve. If the boat rolls too readily with a side load, try lowering ballast or widening the waterplane. If it trims by the stern under cargo, move fixed equipment forward or redistribute payload toward amidships.
Then repeat the baseline and the relevant test. This cycle of define, test, observe, revise, and retest is more valuable than any single successful float. It is the practical core of design iteration.
🧭 Know What a Model Cannot Predict
A small still-water model cannot reliably predict full-scale behaviour in waves, wind, turning, sloshing tanks, structural loading, propulsion effects, or damage flooding. Scale effects can be substantial, especially where viscosity, surface tension, and wave patterns matter.
Professional vessel stability work uses approved data, loading conditions, regulations, and operating limits appropriate to the vessel. Treat this activity as conceptual learning, never as a method for approving a real craft or modifying one for service.
🎓 Turn Results into Design Questions
Once you have a working model, ask questions that extend beyond “did it float?” What is the maximum sensible payload before freeboard becomes too small? Which load position causes the greatest heel? Does low ballast help enough to justify lost payload?
You can also compare a monohull with a simple catamaran arrangement. Two separated hulls may provide substantial initial stability, but connecting structure, weight, and behaviour in waves introduce different design considerations.
🌟 The Core Lesson: Weight Must Be Managed, Not Just Carried
Your mini boat succeeds when its hull displaces enough water for its total weight, its centre of gravity remains compatible with its restoring ability, and its loads are arranged to preserve freeboard, trim, and stability.
That is the central marine engineering insight. Capacity is never only a number on a scale. It is a condition defined by where weight is placed, how high it sits, what can move, and how much safe buoyant volume remains when the vessel is disturbed.
A boat is safe not simply because it floats, but because it can keep floating in a controlled, stable condition as its load and environment change. Build, test, adjust, and let each waterline mark teach you what the design is saying. 🚢⚓🌊