
The accommodation lights dip for a moment, a cargo pump is waiting for power, and the engineer on watch is asked to place another diesel generator on the bus. It can feel like a routine request—until a missed detail turns a normal start into a trip, a fire risk, or a blackout.
A marine generator is not simply an engine with an alternator attached. It is part of a connected power system, supplied by fuel and cooling water, protected by alarms, and often expected to synchronize with a live switchboard.
The safest start is therefore decided before the starter motor turns. A methodical round makes abnormal conditions visible while there is still time to correct them.
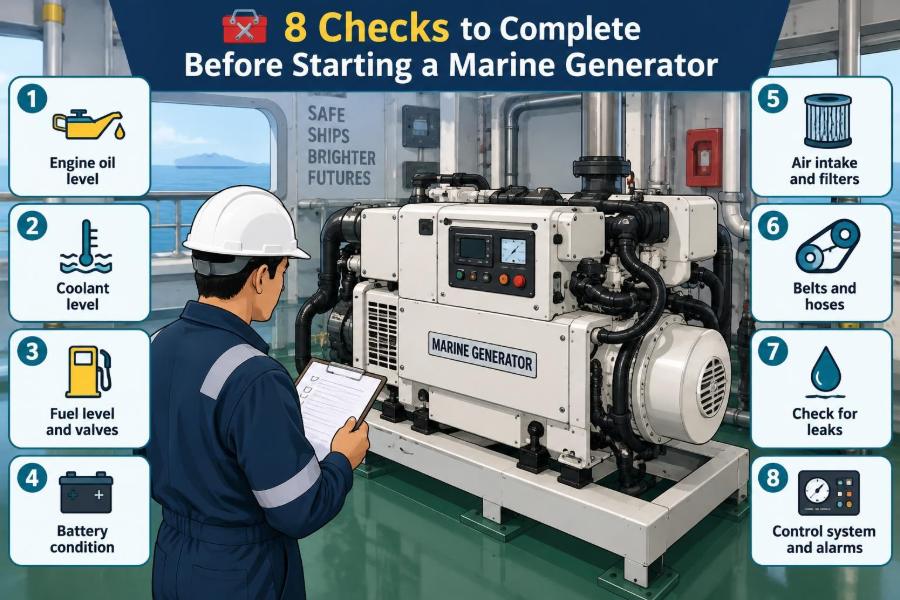
This article organizes the job around eight essential checks, then breaks each one into practical observations and decisions. Always follow the vessel’s approved procedures, maker’s manual, permit requirements, and the chief engineer’s standing orders.
⚓ 1. Treat generator starting as a power-system operation
Starting a standby generator affects more than the machine itself. It may change available fault level, load sharing, emissions, ventilation demand, and the risk associated with work being carried out elsewhere.
Before touching controls, establish the operational purpose: is the generator being started for harbor load, sea-going redundancy, planned maintenance, cargo operations, testing, or an emergency response? The purpose determines the correct lineup and the people who need to know.
🗣️ 2. Confirm authority, communication, and the intended sequence
Notify the watchkeeping engineer and any relevant bridge, deck, cargo, or electrical personnel according to the vessel’s routines. A generator should not be paralleled or loaded unexpectedly while someone is investigating the switchboard or working on a connected consumer.
Clarify whether the machine will run unloaded, take a defined load, synchronize automatically, or be manually synchronized. Agree on who has control of the breaker and who will monitor the engine after start.
- Identify the generator to be started.
- State whether another generator is already online.
- Confirm the expected load transfer or sharing plan.
- Record or report abnormalities before they become someone else’s surprise.
🧰 3. The eight checks at a glance
A useful pre-start round can be grouped into eight core checks. The order may differ by vessel, but the logic should remain: make the space safe, confirm the machine is healthy, prove its support systems are ready, and only then start.
| Core check | Main question | Typical evidence |
|---|---|---|
| Safety and permits | Is it safe and authorized to operate? | Personnel clear, work controls reviewed |
| General condition | Is the unit mechanically intact? | No leaks, loose items, or damage |
| Lubrication | Can bearings and moving parts receive oil? | Correct level and priming condition |
| Cooling | Can heat be removed? | Levels, valves, strainers, pumps ready |
| Fuel | Can clean fuel reach the engine safely? | Correct tank, valves, filters, no leakage |
| Starting air or electric start | Is reliable starting energy available? | Pressure or battery condition confirmed |
| Electrical protection | Is the alternator and breaker safe to connect? | Breaker position and protection status checked |
| Controls and readiness | Will the unit start, govern, and accept load correctly? | Mode, emergency stops, alarms, settings verified |
🦺 4. Check safety, isolation, and work boundaries first
The first essential check is not a fluid level; it is safety status. Walk into the generator space expecting that maintenance, inspection, or cleaning may have changed the condition since the last run.
Review any lockout/tagout arrangements, permits to work, danger notices, and local instructions. If a starting circuit, turning gear, fuel supply, or breaker has been isolated for work, do not remove an isolation just to make the machine available.
Make sure people are clear of rotating machinery, hot surfaces, and the switchboard. Verify that tools, rags, portable lights, and temporary equipment have not been left where vibration or airflow can create a hazard.
🚪 5. Inspect the generator space before inspecting the machine
Look and listen as you enter. A strong fuel smell, mist, smoke, unusual heat, pooling liquid, poor lighting, or abnormal noise deserves investigation before a start is attempted.
Ventilation is part of readiness. The engine needs combustion air, the alternator needs cooling air, and the space must not allow heat or flammable vapor to accumulate. Confirm that dampers, fans, and ventilation arrangements are in their required operating position.
Never use a generator start as a way to “see whether” a suspected leak is serious. Find the source and follow the vessel’s reporting and repair process. 🔍
👀 6. Carry out a slow external condition round
The second core check is the general mechanical condition. Start at one end of the unit and follow the same route every time so that important items are not skipped during a busy watch.
Look over foundations, holding-down arrangements, resilient mounts where fitted, guards, pipe supports, flexible connections, and cable terminations. Fresh staining around a joint can be more significant than an old, dry mark.
- Check for fuel, lubricating-oil, coolant, and water leaks.
- Look for chafed hoses, loose clips, cracked insulation, and damaged lagging.
- Ensure rotating couplings and belt drives have their guards fitted.
- Remove loose material from the engine and alternator area.
🧽 7. Distinguish a clean machine from a healthy machine
Good housekeeping helps reveal defects, but cleanliness alone is not proof of serviceability. A recently wiped engine may conceal a recurring leak, while a dusty but dry machine may be mechanically sound.
Use touch carefully where surfaces are known to be safe, and compare conditions with the normal appearance of that particular unit. Do not put hands near moving parts, exposed electrical terminals, or hot exhaust components.
If an abnormality is known and accepted under a temporary operating instruction, understand its limits. A defect that is manageable at low load may not be acceptable for parallel operation or high hotel load.
🛢️ 8. Verify lubricating-oil level and oil-system readiness
The third core check is lubrication. Confirm crankcase oil level by the approved method, with the engine in the correct stopped condition and sufficient time allowed for oil to settle where the maker requires it.
An oil level that is too low risks poor lubrication and overheating. A level that is unusually high can indicate dilution, coolant ingress, incorrect filling, or another fault; adding oil without questioning a rising level can make the diagnosis harder.
Check that filler caps, dipsticks, drain valves, filter covers, and sampling points are secure. For systems with a pre-lube pump, accumulator, or priming arrangement, verify the required condition before starting.
📈 9. Understand what low oil pressure protection does—and does not do
A low oil pressure alarm or trip is a vital last line of defense, not a substitute for a pre-start inspection. By the time a protective device acts, the engine may already be operating with inadequate lubrication.
Where the vessel’s procedure allows, confirm that pressure indication and alarm arrangements are available and not intentionally bypassed. Do not defeat a trip, bridge an alarm, or rely on a faulty gauge to get a generator online.
After start, oil pressure must rise in the expected time and remain stable. If it does not, stop according to procedure and investigate rather than waiting to see whether the value recovers.
💧 10. Confirm fresh-water cooling inventory and expansion-tank condition
The fourth core check is cooling-system readiness. Verify jacket-water or central-cooling levels at the designated tank, observing the correct precautions for a hot, pressurized system.
Do not open a pressurized cap on a hot engine. Use sight glasses, remote indicators, or the approved safe method, and allow cooling time when direct access is required.
Low level may point to leakage, poor maintenance practice, or internal loss. Also check for signs of contamination, such as oil where it should not be, but avoid making a diagnosis from one observation alone.
🌊 11. Line up the sea-water or central-cooling side correctly
Where the generator has its own raw-water circuit, ensure suction and discharge valves are in their required positions and that the sea-water strainer is ready for service. On a centralized system, confirm that the correct supply path is available and that no maintenance isolation remains in place.
A shut valve, blocked strainer, air lock, or failed pump can turn a successful start into a rapid high-temperature trip. It can also damage components if operation continues without adequate cooling.
Check the local practice for priming, venting, and confirming flow. Some arrangements provide a visual telltale or temperature indication; others rely on pump pressure or system monitoring.
🌡️ 12. Consider temperature before asking for load
Cooling water, lubricating oil, and engine metal temperature influence how a diesel engine accepts load. A cold standby unit may start normally but should be warmed and loaded according to maker guidance and shipboard procedures.
Preheating systems are especially important for units expected to start quickly. Confirm that jacket-water heaters, circulation pumps, and thermostatic arrangements are functioning if they are part of the standby design.
Do not confuse fast warm-up with good preparation. Sudden loading of a cold engine can create undesirable thermal stress and unstable performance.
⛽ 13. Verify the correct fuel source and tank level
The fifth core check is fuel readiness. Confirm that the generator is supplied from the intended service or day tank and that sufficient usable fuel is available for the planned operation.
Tank level is only one part of the question. Consider whether a recent changeover, bunkering operation, tank cleaning activity, or unusual fuel transfer could affect supply quality or valve lineup.
Use the fuel grade and changeover method specified for the engine and vessel. Starting on an unsuitable fuel or making an uncontrolled temperature change can create operational problems that are not solved by simply increasing throttle.
🔧 14. Trace the fuel path to the engine
Follow the practical path: tank, supply valves, filters, booster or feed equipment where fitted, engine inlet, return line, and leakage collection arrangements. Valves must be open or shut for a reason, not because they “usually are.”
Look for wetness around filter bowls, flexible hoses, injection equipment, and unions. Fuel under pressure can penetrate skin, and fuel on hot surfaces is a fire hazard, so leaks demand the correct protective response.
Drain water or sediment from filters only under the approved procedure and with suitable containment. Repeated contamination is a system issue to report, not merely a draining task.
🧯 15. Check for fuel fire risk around hot surfaces
Fuel system condition is inseparable from fire safety. Inspect high-pressure pipes, clamps, shielding, and leakage drains where fitted, especially around exhaust manifolds, turbochargers, and other hot surfaces.
Thermal insulation and spray shields should be intact. Missing insulation may expose personnel to burns; missing shielding can allow a fine fuel spray to contact an ignition source.
Confirm that quick-closing arrangements and fire safety controls have not been disturbed by maintenance. Their availability should never be assumed after work on valves or remote operating gear. 🔥
🔋 16. Confirm the starting-energy source is available
The sixth core check is starting capability. Depending on the installation, this may mean starting air, an electric starter with batteries, a hydraulic system, or a combination of arrangements.
For air-start systems, verify receiver pressure, isolating valves, drains, and the status of the starting-air supply as required by local procedure. Water or oil accumulation in air systems can cause trouble and should be handled through approved draining practices.
For electric-start systems, inspect battery isolation, charger indication, cable security, and obvious signs of overheating or corrosion. Batteries can deliver very high fault current, so use insulated tools and avoid creating a short circuit.
🔄 17. Ensure the turning gear is disengaged and interlocks are satisfied
A turning gear left engaged can cause serious damage if a start is attempted. Physically verify its disengaged condition using the vessel’s established indication and procedure; do not rely only on memory or a control-room assumption.
Where fitted, turning-gear interlocks should prevent starting while engaged. An interlock is protection against a mistake, but it does not remove the requirement to inspect the mechanism.
Also check any indicator cocks, barring arrangements, or maintenance devices relevant to the engine design. If abnormal resistance or liquid in cylinders is suspected during turning, stop and investigate under the maker’s instructions.
⚡ 18. Inspect the alternator and electrical enclosure externally
The seventh core check is electrical readiness. Examine the alternator exterior for blocked air passages, excessive dust, moisture, loose covers, unusual smell, or evidence of overheating.
Electrical enclosures should be closed and secure before normal operation unless an approved test specifically requires access. Water, oil mist, conductive dust, and loose objects can create tracking, short circuits, or cooling problems.
Do not perform insulation-resistance testing on a machine that is connected or prepared for normal operation unless the approved procedure clearly covers isolation, discharge, and reconnection. Testing itself is an electrical work activity.
🔌 19. Verify generator breaker position and busbar condition
Before starting a generator intended to run unloaded, its generator circuit breaker is normally expected to be open. Confirm actual position from reliable indication and, where procedures require, local verification.
Understand the busbar arrangement: split or closed bus, bus-tie position, energized sections, shore connection status, and any interlocks. A wrong assumption about a dead or live section can expose equipment and people to danger.
Never close a generator breaker onto a live bus without correct synchronization, or onto a dead bus without confirming that the intended supply arrangement is safe. The consequences can include severe electrical and mechanical stress.
🛡️ 20. Check protection, emergency stops, and alarms are in service
The eighth core check is control and protective-system readiness. Verify that emergency stops are reset as required, shutdown circuits are healthy, and no unexplained trip indication remains active.
Protective functions commonly supervise conditions such as overspeed, low lubricating-oil pressure, high cooling-water temperature, reverse power, overcurrent, and electrical faults. The exact arrangement varies, but safeguards must remain operational unless a formally controlled test or repair procedure says otherwise.
Review the alarm panel and control display for active faults, inhibited functions, or communications failures. Clearing an alarm without finding its cause only removes information.
🎛️ 21. Select the correct operating mode and governor setup
Confirm whether the generator is in local, remote, manual, automatic, standby, or test mode. Mode selection must match the plan and must not conflict with automatic blackout recovery or power-management functions.
If the unit will parallel with another source, its governor and voltage-control arrangements must be suitable for load sharing. Incorrect settings can cause hunting, unequal kW sharing, unstable reactive-power sharing, or unwanted trips.
Avoid adjusting protected or calibrated settings casually. If a setting is questioned, compare it with approved records and involve competent personnel rather than tuning the machine by trial and error.
📋 22. Make a deliberate go/no-go decision
Pause after the round. This is the point to decide whether all eight checks are satisfactory, whether a defect is within an authorized operating limitation, or whether the start must be deferred.
A good go/no-go decision is specific. “Looks okay” is weak; “oil level correct, cooling line-up confirmed, breaker open, no active trips, personnel clear” creates a usable mental record.
- Go: all required conditions are normal and the operating plan is clear.
- Hold: information is incomplete, communication is unclear, or a condition needs confirmation.
- Do not start: a safety device is bypassed, work is active, a critical system is unavailable, or a fault requires correction.
▶️ 23. Start according to the approved sequence
Initiate the start from the designated station using the vessel’s procedure. Do not hold a start command longer than permitted or make repeated attempts without considering battery, air, starter, and engine condition.
Watch for prompt cranking, ignition, stable speed rise, and the absence of abnormal mechanical noise. Be ready to stop if the engine behaves differently from its normal starting pattern.
Once running, verify that the starting system has disengaged correctly. A starter that remains engaged can be damaged quickly and may indicate a control or mechanical fault.
👂 24. Perform immediate post-start checks before loading
A successful start is not the end of the check. Observe lubricating-oil pressure, cooling-water temperature and flow indications, fuel pressure where provided, frequency, voltage, engine speed, exhaust condition, and local leakage.
Listen for knocking, surging, belt noise, air leaks, or vibration that was not present before. Look again around filters, cooling connections, and fuel equipment because some leaks appear only when pressure and temperature rise.
Allow the unit to stabilize as required. If alarms, pressure, temperature, or sound are abnormal, follow the response procedure and do not connect the generator simply because it is running.
🔗 25. Synchronize and load with discipline
For a live bus, match voltage, frequency, phase sequence, and phase angle through the approved synchronizing system. Automatic synchronizers simplify the task but do not remove the need to verify that the selected machine and bus are correct.
After breaker closure, confirm that the generator takes and shares real power as intended. Where it operates in parallel, also monitor reactive power or power factor behavior according to the vessel’s electrical practice.
Apply load progressively within operating limits, watching temperatures, pressures, exhaust balance where monitored, frequency, and voltage. A generator that trips after connection may reveal a problem not visible at no load.
📝 26. The core principle: readiness is verified, not assumed
The eight checks work because they force a disciplined chain of evidence: the operation is safe, the machine is intact, its fluids and energy sources are available, its electrical connection is controlled, and its protections can respond.
Routine does not make this job less important; routine is what makes a consistent inspection possible under pressure. Use the same logical path, document abnormalities, and stop when a condition falls outside approved limits.
The best marine generator start is the one made only after every critical condition has been positively confirmed. ⚓🧰⚡