Who doesn’t love the freedom of flying across the open water? The warm sunshine, the cool waves — any day topside is a great day in our book. Any responsible boater knows that safety ensures a good time on the water. One element of safety that can’t be overlooked is the knowledge of common boat knots and how to use them properly.
Formula is happy to offer helpful boating tips and tricks to maximize your enjoyment on the water. We’ve gathered together this guide to essential knots for boaters to reference and practice.
Importance of Learning to Tie Knots
Knowing how to confidently and successfully operate a boat requires extensive knowledge of boating techniques on and offshore. One of the most important skills you should learn is how to tie knots for boating. There are many types of nautical knots, and it is important to have a basic knowledge of which rope knots to use in a variety of situations.
Why do watercraft owners need to know knot tying for boats? Depending on the function of the rope — for instance, if it’s used for docking or hoisting sails — there is a specific type of knot that helps you accomplish the task at hand. Using the wrong type of knot can be ineffective and unsafe.
The first piece of knowledge you should know about boating knots is that not all knots are referred to as knots. The term “knot” refers to knots tied on the end of a single rope line. Bends are knots used to join two lines together. Hitches are knots used to secure rope lines to another object that’s not another line, such as a cleat or stanchion.
A few other rope terms boaters should know are the bight and the working end. The bight is the loop formed on a rope while the working end — or standing end — is the opposite end of the rope that is not secured to anything. There are many reasons why all boaters need to be able to identify which type of knot, hitch or bend is required to secure a line.
Types of Knots, Their Purposes and How to Tie Them
There are many types of nautical knots, but which are considered important sailing knots boat owners should know? Thankfully, most boaters can get by learning how to tie a few common knots. Here is a quick guide discussing many essential knots for sailors to use, why they are used for boating and how to tie them correctly. Practice these techniques in your spare time and you’ll be all squared away in no time.
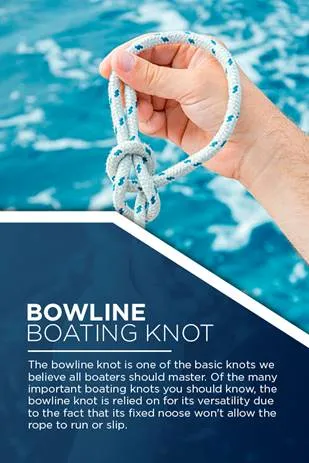
BOWLINE BOATING KNOT

The bowline knot is one of the basic knots we believe all boaters should master. Of the many important boating knots you should know, the bowline knot is relied on for its versatility due to the fact that its fixed noose won’t allow the rope to run or slip. Although it’s secure, it can be easily untied manually no matter how tight the knot is. Practice these steps to tie a bowline knot:
1. 1. First, lay the rope across your non-dominant hand and make a small loop in the rope.
2. 2. Run the working end through the loop from the underside.
3. 3. Next, wrap it around the standing line and down through the loop’s topside.
4. 4. Pull the working end to tighten.
For more robust tightness, use a double bowline boating knot. This involves the same steps as a traditional bowline knot except you’ll wrap the rope around your hand twice. There are other types of bowline knots as well, including the Spanish bowline, running bowline, Portuguese bowline and the bowline on a bight.
STOPPER KNOT
Any time you tie a knot in a line, you hope you’ve used the correct knot, bend or hitch properly and it won’t come loose. Unfortunately, a great knot might not stop a line from pulling through a rope clutch. Thankfully, you can tie a stopper knot to the end of any rope to prevent this from happening. Stopper knots do not come untied easily like other knots, making them ideal for heavy-duty applications. To tie a stopper knot on a line:
1. 1. Wrap the working end of the line around your palm twice.
2. 2. Slide the working end beneath the two loops created.
3. 3. Remove the rope from your hand and use the working end to pull it tight.
CLEAT HITCH
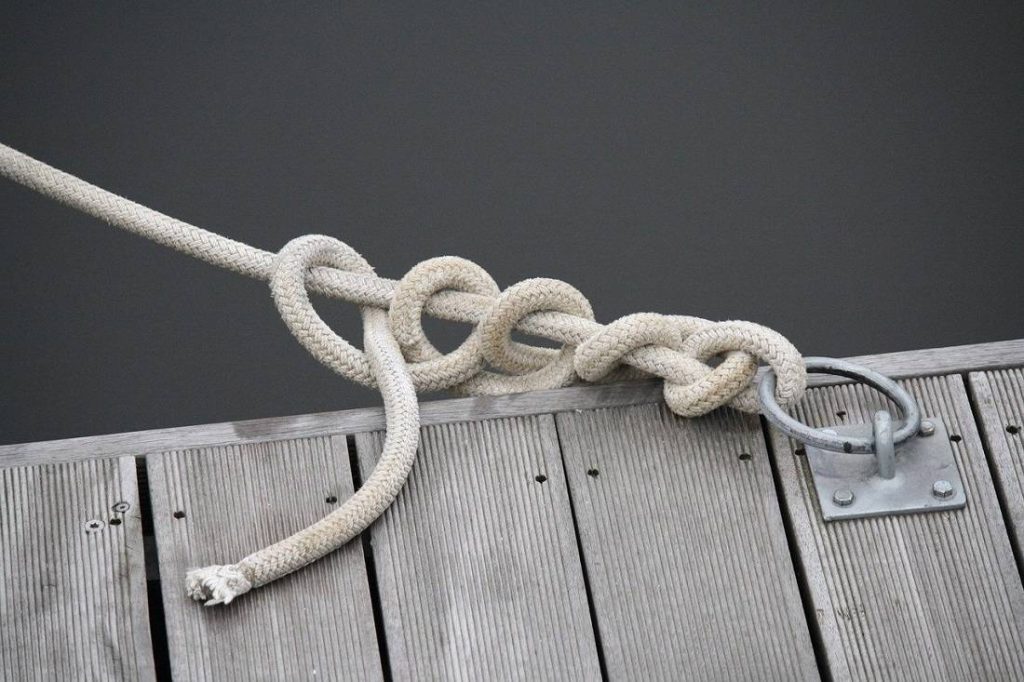
When securing a line to a cleat — fittings which temporarily or permanently secure a line from a boat to a dock — you need to use a proper cleat hitch. Using another knot, bend or hitch is not recommended, making the cleat hitch knot one of the essential knots for boaters to know. If you have any spare time on a dock, deck or boat, practice tying a cleat hitch knot by performing these steps:
1. Wrap the line one full time around the cleat.
2. Make a figure-eight around one horn of the cleat.
3. Make another figure-eight around the other horn of the cleat.
4. Pass the working end under the line and pull to tighten.
TWO HALF HITCHES
When learning how to tie knots, you’ll notice that some types of nautical knots pair well with other hitches or bends. For example, two half hitches can be added to a clove hitch to prevent slipping. Two half hitches are quite simple to tie on a line:
1. 1. Wrap the rope around the desired object twice.
2. 2. Create a half hitch by running the working end behind the standing end and guide it through.
3. 3. Repeat this process to create a second half hitch.
When talking about two half hitches, it’s important to understand why a single half hitch is rarely ever used alone. A single half hitch is simply an overhand knot tied on a rope wrapped around an object. Unfortunately, it’s not strong or secure on its own. However, it can lend additional support to another, stronger knot.
ROLLING HITCH
What if you’re tying a boat to a dock or deck and the structure lacks cleats for a secure cleat hitch? You can easily use a rolling hitch to secure the vessel to a post. Use this secure method by:
· – Wrapping the end of your rope around the pole once.
· – Wrap it over the pole again but cross under the standing line as well.
· – Wrap it around the pole for the third time above the standing line without crossing over it.
· – Run the working end underneath the third wrap and pull it tight.
CLOVE HITCH
The rolling hitch is more secure, but if you need an effective hitch to secure your vessel to a pole temporarily, you can also use a clove hitch. Clove hitches are used for different applications, particularly those which aren’t heavy-duty, like securing fender whips. The lines of these hitches require constant pressure and can come loose through significant movement. To tie a clove hitch to a pole:
1. 1. Wrap the rope around the pole once.
2. 2. Pass the rope over the top of itself as you wrap it a second time.
3. 3. Slide the working end under the second wrap and pull to tighten.
SHEET BEND
When tying two lines together, it’s helpful to know how to tie a sheet bend. Also known as a weaver’s knot or a becket bend, the sheet bend knot can secure two ropes of different diameters or sizes. If you take a look at a traditional fishing net, you’ll notice that all ropes are joined by sheet bends. Learn sheet bend knot tying for boats by practicing the following steps:
1. 1. Create a loop at the end of one rope.
2. 2 Take the working end of the second rope and pass it through the underside of the first rope’s bight.
3. 3. Pass the working end of the second rope around the first rope.
4. 4. Run the second line’s working end under the second line and pull to tighten.
There is also a slipped sheet bend that helps you quickly untie your lines even if they’re tied to a load. After you finish step four of the traditional sheet bend, run the working end back under the standing part of the line then tighten by pulling both ends of the standing line.
ANCHOR BEND
Even though it’s called a bend, the anchor bend knot is actually a type of hitch knot. The anchor bend is unsurprisingly used regularly to tie a rope to an anchor then secure the anchor to the ship. Other uses include securing the rope to a ring or another point of termination.
1. Run the working end of the rope through the anchor’s shackle twice, leaving both turns open.
2. Take the working end behind the standing line of the rope then feed it through the first turn and tighten.
3. Tie the working end of the rope to the standing line with a backup knot to ensure that it doesn’t come undone and lose your anchor.
TRUCKER’S HITCH
When securing a heavy load, you’ll need a reliable knot like the trucker’s hitch. The knots used in this hitch enable it to be pulled as tight as possible without giving any slack. Trucker’s hitches are reliable and easy to use once you master these steps:
1. 1. First, tie one end of the line to a fixed object or platform like a cleat.
2. 2. Next, tie a half hitch in the center of your rope. Keep it loose to form a loop.
3. 3. Then, wrap the line around another point and run the free end through the loop.
4. 4. Pull the working end as tight as possible then consider using two half hitch knots to secure it.
FIGURE-EIGHT KNOT
If you’re new to boating but have a little knowledge about ropes, you may have heard of the figure-eight knot in another context. The figure-eight knot is also used in rock climbing, and you may hear this stopper knot referred to as a Flemish bend or a figure-eight bend. Boaters prefer this popular easy to undo knot because it provides a safe, simple and secure way to keep two ropes together. To tie a simple figure-eight knot in a single rope, follow these steps:
1. 1. Make a single loop on one end of the rope.
2. 2. Pass the working end of the rope through the loop.
3. 3. Pull both sides of the rope to tighten the knot.
Practice these steps to learn how to tie a figure-eight bend with two ropes:
1. 1. Take one rope and make it into the shape of a figure-eight.
2. 2. Taking the second rope in your hand, you’ll want to feed its working end around the knot where the working end of the first rope is.
3. 3. Keep both ropes parallel while feeding the second knot in.
4. 4. Pull gently on the working ends, then on the standing lines, alternating between the two until the knot is tight and symmetrical.
About Formula Boats
At Formula Boats, it’s our mission to present you with the ultimate boating experience that is safe, fun and unforgettable. We’re committed to making your vision a reality so you can cruise into the horizon on top of your own personalized Formula boat. Don’t settle for the bare minimum or pay extensive fees for after-market enhancements. Design the boat of your dreams, customizing everything to your standards including model, engine, graphics, color, piping, cabin decor, GPS, thermal night vision camera, on-board electronics and more.
If you’ve never built your own customized boat before, so many options and choices may seem overwhelming at first. If you’re unsure of exactly what you want but know that you’re ready for the open water, let us help you find the right vessel for you. Browse our stunning inventory to learn more about our fantastic selection:
· – Bowriders: A gentle cruiser that glides smoothly across the water.
· – Crossover bowriders: A luxury bowrider boat with a day-into-night cabin, this crossover gives you the flexibility for rest and play.
· – Super sport crossovers: Taking luxury to the next level, the super sport crossovers comfortably offer overnight room for four.
· – All sport crossovers: A revolutionary super sport crossover with adventurous dayboat and serene overnight versatility, the best of all worlds is available in the all sport crossover.
· – Sport cruisers: The best in sport cuddy boats on the market, the sun sports collection is guaranteed to please boaters of every lifestyle.
· – Performance cruisers: Dressed to impress inside and out, our performance cruisers turn every moment on the water into an envy-inducing thrill ride.
· – Yachts: The premier performance power yacht boaters could only dream of is now fully customizable and ready to own the open water.


Comments are closed