I. With use of LEFT-HAND Drills
Removing broken bolts is one of those pesky jobs that few people look forward to. This is one of those “try-it-you’ll-like-it” methods. During many years of working with cars and machinery this method has proven to be very successful.
The champion of methodsfor removal of stubborn broken boltsis to drill them out,using a left hand drill bit and a reversible drill. (The good quality, variable speed, 3/8″ models, which produce good torque at low RPM, work best.) As always with drilling holes, drill a small “pilot hole” first, then drill a larger hole through the broken fastener. (It’s easier to drill centered and straight by using a small drill first, but be careful not to break the small drill!)
Most bolts come out before the hole drilling operation is finished.
(Then there is no need for “easy-outs,” which sometimes break off in the drilled hole and make matters worse.)
We just happened to have a few tightly rusted studs and nuts, which all broke off when attempting to remove the nuts. The project was rear fender mounting studs in a 1930 Model A FORD. These studs are threaded into fixtures at the body, behind the rear wheel, where seventy years of road grime splashed on them. And back in those years nuts and bolts were not plated with zinc or other anti-rust coatings, as our modern fasteners often are. The nuts were nearly welded to the studs by rust, and the studs were equally rusted into threads at the body. It was impossible to remove the fenders without breaking the studs. This was about the worst possible case of corroded and rusty fasteners.
In photos, we will show the removal of the old studs, and also the tools we used for this work.

The first step is to flatten the surface at the end of the broken bolt. Where bolts have broken, the surface is often jagged and sloped, which will cause the drill bit to wander off-center, when attempting to drill the hole. The stud in the photo was broken just above the surface, and we used a grinder to flatten the surface at the broken stud. When a bolt is broken off below the surface of a threaded hole, a jagged break often can be flattened with punches to get a better surface for drilling.
We used a heavy hammer and center punch to leave a “dent” for the drill to follow. Without center punching first, it would be impossible to keep the drill in the center of the bolt.

Before this step, we drilled a small pilot hole using a 1/8th inch drill. (The small diameter drill is easier to keep straight and centered than a large diameter drill.) Then we used a ¼ inch drill to finish with this 5/16inch stud.
The drill will attempt to grab the bolt just when breaking through the backside. Typically, that’s the moment when the broken fastener will spin out of the threaded hole. Also, when drilling through the broken bolt, vibration will help to break it free. And drilling completely through leaves the bolt as a hollow tube, which may allow it to slightly collapse and loose some its grip at the threads.
This classic case of rust frozen fastener, shown above, came out squealing and with much powdered rust pouring from the threads. Notice that the threads at the fastener are even galled. Before installing a new stud we oiled the threaded hole and cleaned the threads with a tap.

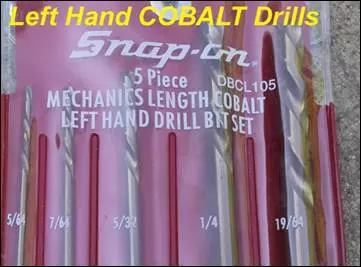
Notice that these are LEFT-HAND drills, and they must be used with a reversible drill. Ours are by Snap-On tools, and Snap-On offers more than one model of Left Hand drills. Snap-On tools are typically excellent in quality, but other tool companies also make left-hand drills. (Check with the tool dept. at Sears, or your favorite tool store.)
The drills in the set shown above are short length High Speed Drills, and are rated for drilling in steel and other metals.
The set shown below are COBALT, long length, left-hand drills. The Cobalt is harder material than the standard high-speed drills, and the Cobalt drills are our choice for drilling out grade 8 bolts.
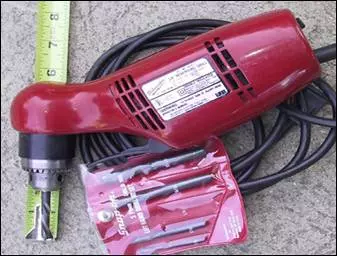
The short-length drills, used with an angle-head drill motor, can get into places where lack of clearance would prevent working with a long drill and typical drill motor.

Sometimes the longer drill bit with typical drill motor is needed to reach down into places where the angle-head and short drills would not work.
What ever the set-up used, the DRILL MOTOR should be powerful enough to drill at low RPM without stalling. Smooth running, powerful, and strong even at low RPM drill motors are best suited for this work.
IMPORTANT
As with any drilling operation, watch for chips while drilling. When making chips material is obviously being removed. If the drill is smoking and not making chips, then stop immediately. The drill may have to be sharpened, and probably reduce the RPM while drilling.
If a fastener does not come out with this left hand drill method, there are various types of “easy-out” extractors. Or, sometimes there is opportunity to drill an over size hole and then re-thread the hole to the next size larger. Some applications can use the next size larger bolt, otherwise the “heli-coil” method can restore the threaded hole to its original size. But, these alternative methods will require drilling first, so the left-hand drill method is never a wasted effort.
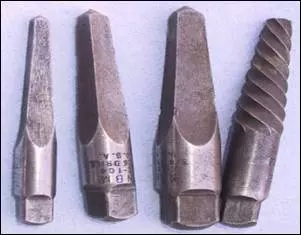
Two types of “EASY-OUT” extractors are shown in the photo above. When available, the type on the right is a favorite and has been less likely to break off in the broken bolt. But the three at the left have also been successfully used to remove broken bolts.
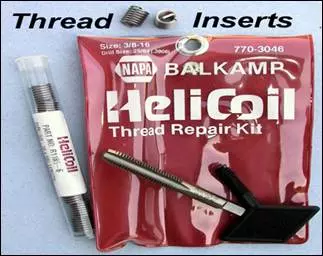
Especially in soft aluminum, the “HeliCoil” thread repair kit is very useful. The hardened steel thread insert actually adds strength when used in soft metals such as aluminum. The method is to drill the proper size hole for the next size larger thread tap. Then cut new threads in the drilled hole using the tap. And then use the tool to install the new thread insert. The thread insert is threaded both inside and out.
And always when using a thread tap, turn it in about 1/3 turn at a time, or until it begins to feel snug. Then back it up to cut the removed material. And then turn the tap in some more. (Simply forcing the tap into the hole will plug the tap and not result with good threads.)
TIP
A stud is stronger than a bolt, especially when the threads are questionable, which sometimes is the case after struggling to remove a broken bolt from a threaded hole. Minor damage to threads when struggling to remove the broken bolt can reduce the strength of the threads. And then when the new bolt is tightened into place, sometimes the remaining threads will pull out.
With correct stud installation, the stud is screwed into the threaded hole without applying pressure to the threads, and without galling the threads. After stud installation, the part is slipped over the stud, then install the correct washer, and then tighten the nut.
The stud is stronger because thread contact at the stud and at the threaded hole will be stationary at the time pressure is applied (when tightening the fastener). But when a bolt is used to mount a part, the bolt is rotated in the threaded hole during tightening, which can tear out weak threads.
When installing the stud into the threaded hole, the author prefers to strengthen and anchor the stud into place with Loctite. (Rather than double nut the stud and force it against the bottom of the drilled and threaded hole.) The “red version of Loctite,” is preferred. (“stud and bearing mount” purpose version, it’s the permanent version)
No doubt there will be times when clearance problems will make it impossible to use a stud, rather than a bolt. Sometimes there is not room to slip a large part over a stud, but rather the part has to be slipped into place from the side. (The stud gets in the way–making it impossible to slip the part into place from the side.) But when a stud can be used rather than a bolt, the stud will result with greater fastener strength than the bolt.
II.Apart from this the stud can also be removed by welding the bolt tip to the stud,thereby removing the welded bolt along with the broken stud by use of simple spanner…..
III.Another method is to making a undercut on the stud surface such that it resembles like an screw, so that it can be removed with the screw driver….

